Week 0 - Introduction to the Python programming language
Today you are going to install Anaconda, learn the basics of Jupyter and Spyder, and write your first Python program.
Install Anaconda
Anaconda is a free and open-source data science platform for Python. It serves as a hub for the Python programming language and provides convenient tools for managing all of the different versions of Python and its many packages. Anaconda does a lot of behind-the-scenes work to ensure that packages do not conflict with one another.
To install Anaconda, follow this link and select the correct download for your platform.
After successfully installing the software, start the Anaconda Navigator App, which should now appear in your Start Menu (Windows) or Application Folder (Mac).
Now, use the Navigator App to create a Python environment.
Select the
EnvironmentstabClick the
+box at the bottom that saysCreateGive your environment a sensible name, e.g., Py3 or python3
Check that you are installing the latest version of Python
Click the
Createbutton to create the environment
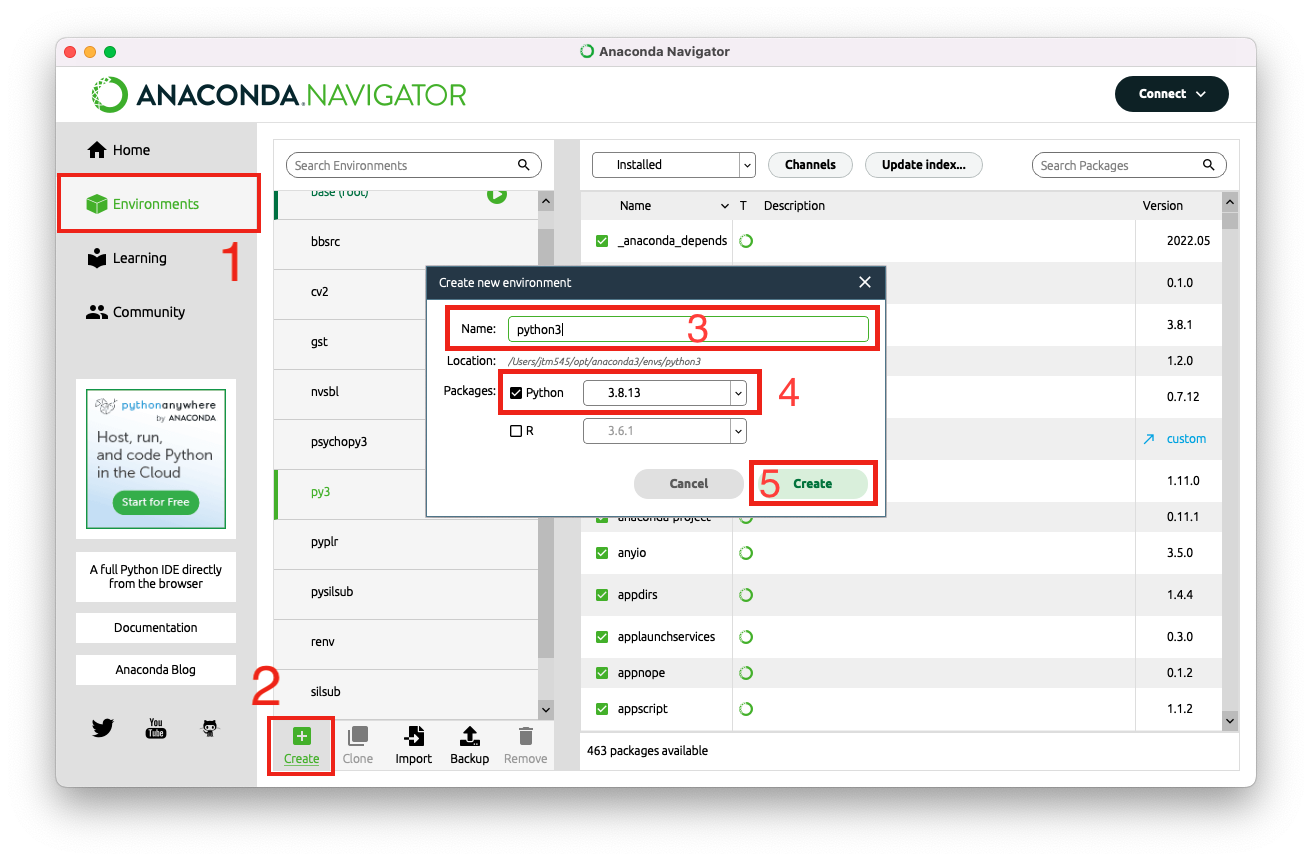
When you click Create, the software will get to work setting up your Python environment. When it has finished, click on the newly created environment to make sure that it is activated.
N.B. A Python environment is a way of isolating the functionality needed for a specific project. If you were a crafty person who had various knitting and cross-stitching projects on the go, it would make sense to keep your knitting and cross-stitching materials in separate boxes so you can quickly grab the right box for the project that you want to work on. Its the same principal with Python environments. If you want to learn more about Python environments with conda, this article goes into a lot of detail, but all you really need to know at the moment is that you have successfully made one, and that you should remember to activate it each time you open the Anaconda Navigator!
Welcome to Jupyter!
Jupyter is a web-based interactive development environment that has become extremely popular in recent years. It is a great tool for beginners as it allows you to experiment freely with code snippets and to present or share your work in accessible and appealing formats. We will use Jupyter for much of this course, and the document you are currently reading was in fact prepared in a Jupyter notebook.
To install Jupyter Notebook:
Click on the
Hometab in Anaconda NavigatorCheck that your newly created Python environment is active
Find the Jupyter Notebook app and click
installAfter installing, click
Launch
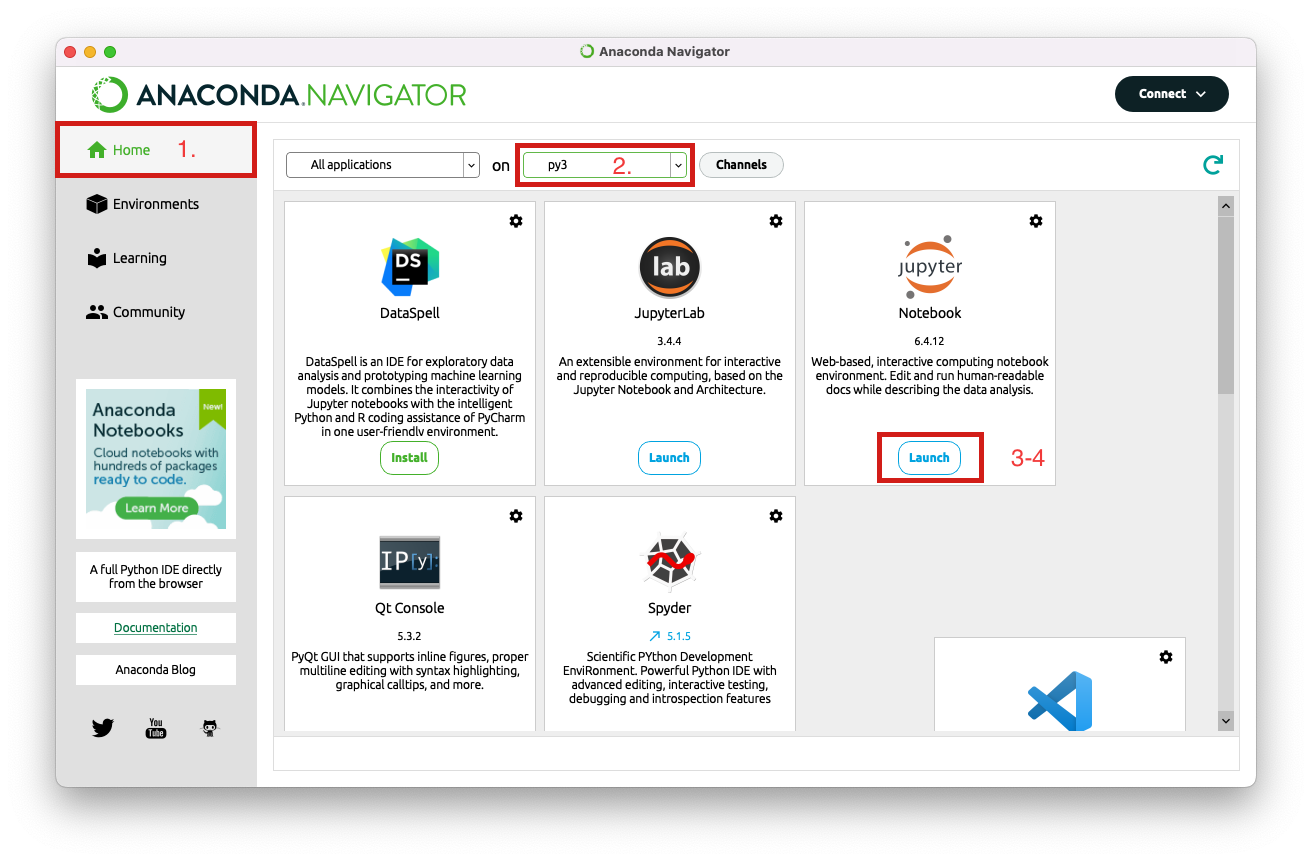
After launching Jupyter, you should see a new tab open in your web browser.
Click on the tab and use the file browser to navigate to the folder where you are keeping the documents for this course.
Find and open the document titled
00_introduction_to_the_python_programming_language.ipynb(that’s this document!)It should open in a new tab. Scroll down to this part of the document.
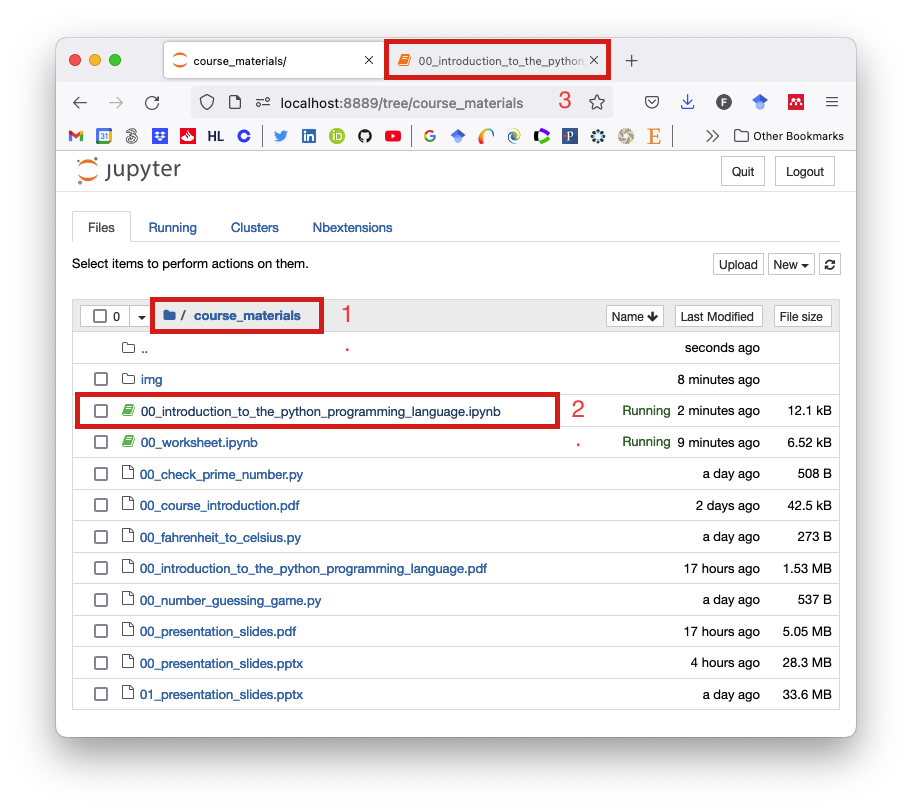
N.B. The file extension for Jupyter Notebooks is .ipynb, which stands for “IPython Notebook”.
Now you are viewing this document as a Jupyter Notebook!
In a Jupyter notebook, everything goes in a cell, and there are three different types of cell.
Cell type: Raw
This is a raw format cell. It simply contains plain text and doesn't do anything special.Cell type: Markdown
This is a Markdown cell.
Markdown is a lightweight markup language for adding formatting elements to plaintext documents.
With Markdown, one can include links, italicise and embolden text, format code,
create quotes,
make a list:
of
various
items
And more.
Double-click this cell to inspect the raw content and see for yourself how the formatting is applied. When you are done, press ``Shift+Enter`` to execute the cell and render its contents with the Markdown engine.
We will not be focusing on Markdown in this course, but it’s a useful thing to know about as it tends to pop up here and there. You can always follow the link above if you are interested to learn more.
Cell type: Code
[3]:
# This is a code cell
# It contains some Python code
# Select the cell and press Shift+Enter to execute the code
# Try changing the values assigned to a and b
# See what happens when you run the code again

a = 1
b = 2
a + b
[3]:
3
An easy way to create a new cell is by clicking the + button at the top of the page.
Try creating a new cell below this one.
HINT: Don’t forget that if you accidentally double-clicked a Markdown cell, you can always re-render it with Shift+Enter.
By default, a new cell is a code cell, but you can change the type by clicking the cell type drop down menu in the toolbar at the top of the page.
Hello, World!
Let’s write some code.
Hello-world is a simple program that is traditionally used to demonstrate the basic syntax of a language. The aim is to get the computer to print the words Hello, World! into the console.
Here’s how to write the hello-world program in Python.
Python
print('Hello, World!')
That was easy! For comparison, here’s how to write hello-world in some other well-known languages.
C
#include <stdio.h>

int main()
{
    printf("Hello, World!\n");
}
Java
public class Main {
  public static void main(String[] args) {
    System.out.println("Hello, World!");
  }
}
Fortran
program Hello
  print *, "Hello, World!"
end program Hello
Note that the Python syntax for hello-world is much more straightforward and intelligible than it is for other languages. This is usually the case with Python, and it is one of the main reasons that people find it such a pleasure to learn.
Now go ahead and write the hello-world program for Python in the code cell below (see above). When you have finished, press ``Shift+Enter`` to execute the code. If you did everything right, you should see the words Hello, World! printed out below your code.
[3]:
# Write your hello world program in this cell
Congratulations!
Now try adding another code cell below this one and instead of printing ‘Hello, World!’, print your own name, someone else’s name, or whatever message you like!
[6]:
print('Hello, beautiful world!')
Hello, beautiful world!
Welcome to Spyder
Let’s move on to Spyder, a free and open-source scientific environment for Python.
Spyder and Jupyter each have their unique features, but essentially they are just different places to write and run Python code. I will encourage you to spend time with both, but naturally you may develop a preference, which is absolutely fine.
Install and launch Spyder from the Anaconda Navigator in the same way you did for Jupyter Notebook. When the application has launched, feel free to follow the tour. If you want to do the tour another time, click on help > show tour in the toolbar at the top of the screen.
Now, click the open folder icon in Spyder and open the
00_number_guessing_game.pyscriptRun the script by clicking the green triangular
Run fileicon in the Spyder toolbarRead through the script and try to figure out what its going to do
Shift your focus to the IPython console, where you should see the words
Enter any number:Type in a number and press
EnterKeep guessing until you get it right!
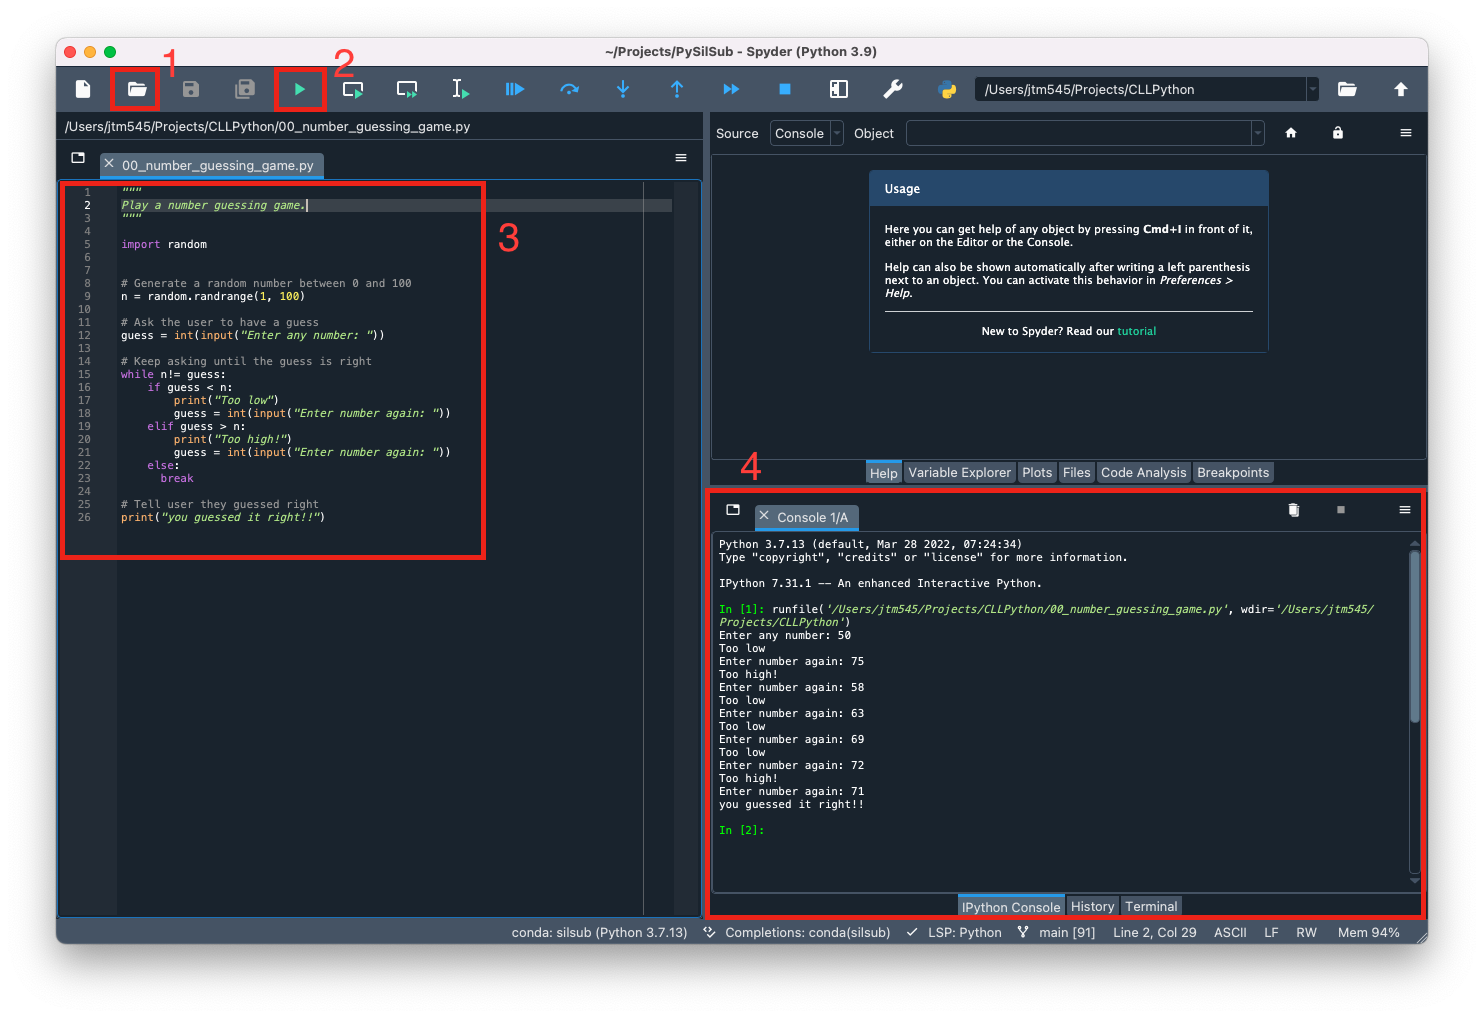
Congratulations, you just run a Python script in Spyder! Now try running the other two scripts:
00_fahrenheit_to_celsius.py00_check_prime_number.py
Great job! Next week we will dive into the syntax, data types and built-in functions of the Python programming language. Before then, please take the time to work through the 00_worksheet.ipynb.